|

SE Software - FAQ/How TO (Version
2.0)
SEOW is an open source add-on to Maddox
Games' IL2 series.
Last updated 23 October
2005 (here is the SE1.0
version)
Campaign
Overview
System
Overview
Requirements
and Recommendations
Non-English
Installations
Software
Installation (for Hosts)
DCS
Options and Configuration
How
to Make a Template
Initializing
a Template
The
Mission Planner and How to Use it With the DCS
Scorched
Earth Campaign Overview
Scorched Earth Online War
(SEOW) is a persistent coop campaign system. The system is
initialized with a starting template which includes all of the squadrons
and moving ground objects that will take part in a given theatre of
operations. The system will then allow for hourly mission generation based
on direct input from two opposing commanders, one Allied and one Axis. The
system will also allow sub-commanders of individual units. All air
operations are planned using a web-based mission planner. You classify
which flights will attack available targets, and when. You have the
ability to quickly assign escort flights to any given strike
flight. Fog of war persists throughout, with recon levels affecting
the amount of information that opposing commanders can use to
plan missions. The mission plans for any given hour in the day cycle are
merged based upon the plans of the opposing sides. The mission is
generated local to the Host computer, then hosted to the squadrons taking
part in the online campaign. The best part of all of this is that the
damage is persistent. If you take out a bridge early in the day, it will
still be destroyed several hours (missions) later. As you can see, SEOW
expands upon elements featured in previous online campaigns, but a major
aspect of SEOW is that it offers persistent damage templating, as well as
an open source format. If you feel like a part of SEOW is not to your
liking, code a new one. We hope to make the process of providing
modifications to the system as smooth as possible and centralized via
http://www.sourceforge.net/
System
Overview
There are three
main parts to SEOW: the Dynamic Campaign System (DCS), the database
(DB), and the Mission Planner (MP). The DCS is a Win32 executable
program front-end to a SQL-compliant database (DB) backend. The
front-end allows for the initialization of a template mission for a
given map in the campaign. It is intended that the full release
system will support all of the existing Forgotten Battles+PF maps, but
within the 2.0beta milestone, Ardennes, Crimea,
Kuban, Kursk, L'vov, Moscow, New Guinea,
Normandy, Prokhorovka, Smolensk, Stalingrad and
Tunis are the only maps fully completed in the DB. Once you see the
granularity of object tracking, you'll understand why only a few maps are
currently supported. There are plans to support Pacific Fighters as well,
but not every feature is done for that yet: carrier group operations and
planning will require augmentations to the MP. The MP itself is a web
application that acts as a mission planning tool for all commanders active
in the campaign. The MP handles all aspects of mission planning,
reconnaissance, reinforcement etc. Presently the MP is available only as a
PHP application, connecting to the standard SEDB via a (free) third-party
ADO library.
Requirements
and Recommendations For Scorched Earth HOST
installation
A
web server supporting PHP 4.3.10 or higher (required to
run MP)
- Free
options: MS Internet Information Service with PHP added (only supplied
by Microsoft on XP Pro, Win2K Pro/Advanced Server, not XP Home!. IIS is installed via the control panel "add/remove
programs". Full admin access to the HOST pc is required in order to
add/remove windows applications.); Xitami Web
Server with PHP added, Abyss Web Server with PHP added; Apache Web Server with
PHP added.
Plus, to run the DCS,
- Microsoft .NET Framework 1.1
(Required to run DCS)
- MyODBC
v3.51.11 (Required to run DCS)
Plus, to run the SE DB,
either
- Microsoft Access 2000 or higher
(Local installation model)
- ACCESS is used to view
the .mdb database file that holds mission results and mission planning
requests. It is vital for anyone wishing to modify the Scorched Earth
code to be able to view and understand the ACCESS database.
or
- MySQL
4.0 or higher (Remote installation
model)
- MySQL is a free server application
that commonly runs on ISP systems of any operating system
flavour. It is
perfect for setting up public online wars using SE. You can download
it from here.
SEOW and
Non-English Installations
The SE software has been developed
using English (Australian and US flavours) as a localization culture.
Reports from users indicate that the DCS and MP are stable when installed
in these localization environments. However, there have been reports of
significant errors when installing in some European localizations (there
are no known users in Africa and Asia so far). In discussions with a user
(ft, aka Fred, from Sweden) the MP was brought up to localization
compliance some months previously. Major issues involved the use of the
character "," instead of "." when delimiting decimal places. Recently,
with DCSv1.0beta(H), several French users (Meliok, Findo) reported DCS
errors. French localization also uses the "," character as a decimal
delimiter, as do some other European cultures. In DCSv1.0beta(I), the DCS
is explicitly told to run using the "Invariant" culture. Users can set
localization options for their PC using the "Regional and Language
Settings" control panel. So far, just changing the decimal delimiter has
not eliminated all DCS errors. There is some suggestion that end-of-line
characters may also be different in the various locales. We are keen to
address this issue! If there is a programmer out there with Visual Studio
.NET who wants to tackle this, just drop us a line at scorchedearth@yahoogroups.com
. We will make a full VS solution file of the latest DCS available for
download to any interested programmer.
Update on Localization: French users
report that setting the PC localization to English(US) and using versions
of DCS1.0beta(I) or later has fixed the localization problem. As far as we
know, there are no outstanding problems with SE v2 and European-style
localization.
Scorched Earth
Software Installation (for Hosts)
Download the SE System files
from the SEOW
File Releases page at Sourceforge. You need the latest DB, DCS and MP
(choose either ASP or PHP version) releases - that is 3 separate
files.
DCS
Installation
The DCS installation is self
explanatory. Just download the .msi file, remove any previous DCS install
on your PC, run the new .msi and it will
- Prompt you to supply an
installation location for the DCS;
- Install the DCS
program. Easy!
Please note that DCSv2
installs a "DCS.ini" file in your user "My Documents" folder, in a newly
created "SEDCS" subfolder. Test show that the .msi installer does this
correctly, but you never know... The DCS.ini file is used to store your
preferences between DCS sessions. The DCS will not run correctly unless
you have already installed the .NET Framework 1.1 and MyODBC v3.51.11 (see
above). Anyone can install the DCS as a standalone application - you don't
need FB+PF, the MP or the DB to use the DCS. The DCS will quite happily
connect to a remote MySQL DB and build new SE missions or analyze a log
file. This standalone installation is a "Remote SE Campaign Host"
install.
DB
Installation
If you want to set up a SE
database, you need to download the latest DB file. You have two choices:
SEDB in MS Access format, or SEDB in MySQL format.
SEDB in MS Access
Format
This is perfect for squad
wars, LAN parties etc, where you just want a simple local installation
of everything. Just download and unzip the SEDB MS Access file anywhere
on your file system and name it whatever you like. Note that the DB
contains all your campaign information: overwriting your current DB file
with a new release will eliminate any current campaigns you might
have. You may have to alter your SEDB folder privileges if you are using
XP PRO (see below).
SEDB in MySQL
Format
This is the option for the
power user. Download and install MySQL 4.1 or higher and set up your own
MySQL server (anywhere on the internet). Extract the .sql file from the
SEDB MySQL zip file and import it into your MySQL database. Note that
InnoDB table types are required by the DCS for best performance (row
locking and transaction support). ASCII character sets are likely to be
sufficient, but we have tested purely against Latin1. Set up the
connection accounts to the database. The MP and DCS will connect to the
database using whatever connection login accounts you specify. For
proper operation these login accounts must have SELECT, UPDATE, INSERT,
DELETE and EXECUTE privileges on the database. If you wish to
autoarchive campaign files directly through the MySQL server, the
accounts should also have the FILE privilege (but this is not
recommended for security reasons).
How fast is MySQL? Well,
this release of the DCS uses a very simple connection layer called
MyODBC. This is easy to program with, but is known to be slow. The DCS
also uses encapsulates ALL SQL queries within transactions. Another
slow-down. Therefore DCS2.0 is not a fast MySQL implementation, our
focus here in v2.0 was on establishing functionality rather than on
performance tuning. Nevertheless, we have noticed some ways of boosting
MySQL performance. First, use the compression setting - this can give
40% improvement on large queries. Second, MySQL 4.1 performs
significantly faster than earlier MySQL versions, this may be something
to do with the improved InnoDB engine support in 4.1. We hope to post
here some benchmarking data on standard operations with different MySQL
releases. The DCS now reports elapsed times for Analyze/Build
operations. Feel free to perform your own tests using SE campaign
templates and send the results to us - we will report the details here.
MP
Installation
Finally you need to download
the latest MP release, which is now available only in PHP format
(ASP is deprecated for SE2). Note: there is no sense in installing
the MP unless you are already sure that your web server is running and
handling PHP scripts properly. Delete any previous release of the MP and
unzip the new MP into your web server document tree. You can do this
without harming any campaign information you might already have in your
DB. Depending on how you wish to set up your SE database(s), you may have
to edit the MP\Scripts\MP-Connection.php script to locate the DB services
you want. Alternatively, from MP-v4.36 onwards, you can use the in-built
Connection Administration GUI:
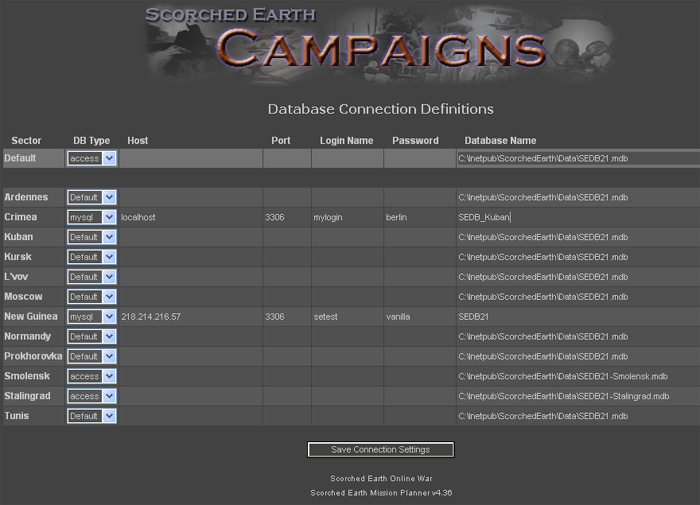
This GUI is contained in the
MP itself, at the URL http://localhost/ScorchedEarth/MP4/Scripts/MP-Admin.php
(assuming you are using a local MP instal). You will need a password to
use the GUI connection manager. This password is set in the
Scripts\MP-Configuration.php file (near the top). To change entries, place
your mouse cursor INSIDE each cell and type your information. Moving your
cursor outside the cell will register the change (do not hit the ENTER key
- this will execute the "Save Connection Settings" form button). MySQL
connections require ALL fields to be filled. MS Access connections require
only the last field to be filled. See MP-Connections.php file for more
information if you are unsure. You can point each Sector at an entirely
different database if you like, and you can use mixtures of Access and
MySQL databases for different sectors, as above. Each database will
potentially have its own commander login accounts. Also, note that the DCS
does not yet support simple multiple database connections as elegantly as
this - you must re-enter your DCS connections each time if you want to
Analyze or Build in different databases. Note: your web server
MUST have write access to Scripts\MP-Connection.php for this GUI to
work.
The MP is a simple
collection of PHP scripts and image folders, so you can install it
anywhere on a PHP-enabled web server. For example, with IIS web server the
MP is usually installed into the common IIS folder. In default setups,
this is C:\Inetpub\wwwroot\ . In our cases, we create a
ScorchedEarth folder manually within wwwroot. Then UNZIP the MP zip file
into the c:\Inetpub\wwwroot\ScorchedEarth\ folder. Then set up your DB
connections - as a first trial you may only want to use a single SEDB, so
you can enter it as the default connection and use it for all sectors.
Later you can reconfigure your DB connections as you need to.
To test the installation,
open up your web browser and go to
http://localhost/ScorchedEarth/MP4/
You will immediately get
either a screen with a list of SE Sector names, or a screen showing that
you have an incorrect DB connection setting for at least one sector. If
you have got the DB connections sorted out, all you have to do is click on
a Sector name and you will be directed to login as a valid commander in
that sector.
Type admin as user and
password as the password.
There will be no campaigns
initialized into the system until you follow the next steps using
the supplied test template (or one of your own), and the DCS
program.
VERY
IMPORTANT STEP FOR XP PRO and MS ACCESS
In order for the MP to
work with the MS Access database version, you may need to set your web
server's 'webuser' account to have read/write/execute access to
the folder where the .mdb file was stored. Go to that folder in Windows
Explorer, and right click on the folder. Select Properties. In this
dialog box you should see a Security tab.
NOTE IF
YOU DON'T SEE SECURITY TAB!:
You will have
to turn off "simple file sharing" for the folder. In order to turn off
simple file sharing, you should go into the folder using Windows
Explorer : Click on Tools/FolderOptions/View/ One of the last clickable
options therein is "Use Simple File Sharing (Recommended)" UNCLICK THIS
option. Now, go back out to the Data folder icon itself, right click,
then click on Properties. You should see a SECURITY tab now that you
have turned off simple file sharing.
You should see several
users listed with permissions shown at the bottom. Click the ADD
button.
Now, you are going to want
to add an account for IUSR which is for any internet user that accesses
this particular folder on your PC using IIS. You will need to give them
full write, read and execute access to this and only this folder and to
the DB (.mdb) file. The format of the entry is as follows
YourComputerName\IUSR_YourComputerName
You should be able to see
your computer name in the other accounts. There should be for example a
YourComputerName\administrators or similar account. Use that same
computer name convention.
Once you've ADD'ed the new
"Internet Guest Account" entry, give that entry Full Control (ALLOW
checked on)
Voila! Sounds difficult,
but what you are doing here is giving internet users full access to
write to the .mdb file, so your campaign commanders can lodge their own
missions.
DCS
Options and Configuration
The DCS stores its
configuration settings in a text file created at installation time. This
file is the user's "My Documents\SEDCS" folder, and it is called DCS.ini.
The DCS reads this at startup and writes out the latest preferences when
closing. Other campaign-related options are held in the
database.
The DCS has various options
that can be set by the HOST to configure their own campaign system. In DCS
2.0 these options are accessed using a tabbed form displayed by selecting
DCS:File:Options.
Database
Tab
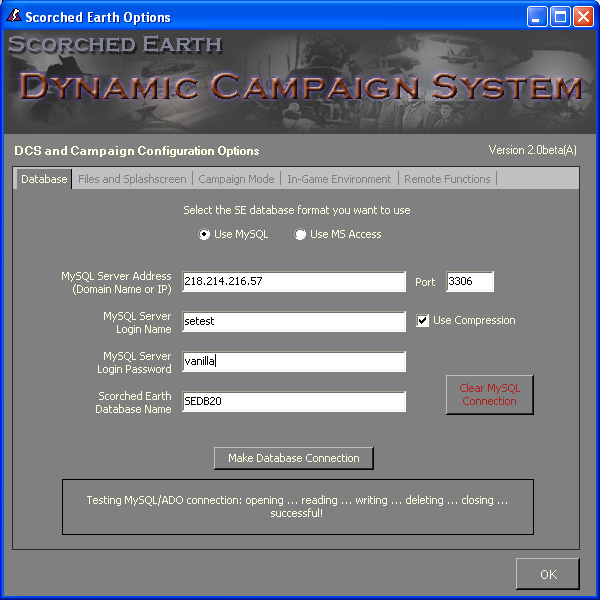
Here you can use the radio
buttons to select either MySQL or MS Access database format:
MySQL
Because MySQL is a server,
it requires address and security settings. To make a connection you will
need to gather the following information from the SEDB host.
MySQL Server
Address: Can be IP number or domain name.
MySQL Server
Port: A number, default is 3306 for MySQL
servers.
Use
Compression: Whether to perform compression of
SQL queries (recommended).
Use
Transactions: Whether to encapsulate SQL queries
in transactions (recommended).
Use Extended
Inserts: Whether to use MySQL-style extended
inserts (recommended).
MySQL Server Login
Name: The account name to connect with.
MySQL Server
Password: The password associated with the Login
Name.
Scorched Earth
Database Name: The name of the database on the MySQL
server that contains the SE tables and information.
MS
Access
MS Access is only
supported in local/LAN mode, so the security requirements are lower.
MS Access Database
Location:
An absolute path to the SEDB .mdb file, either on the local
filesystem, or via a mapped drive (UNC format).
For both DB formats, the "Make
Database Connection" button attempts to establish a ODBC connection to the
database and test read/write operations. The Reset buttons clear all
settings associated with the relevant connection format. All settings are
saved in the DCS.ini configuration file when the DCS is closed.
Files and Splashscreen
Tab
This tab covers locations of
local files where the DCS reads and writes to, plus the display of the
splashsceen.
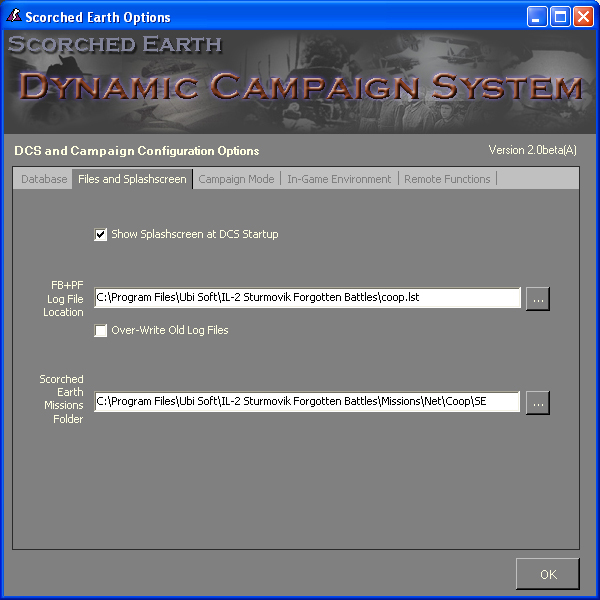
- Show
Splashscreen - uncheck this to stop the splashscreen
showing. If it is showing, you can immediately abort the splashscreen by
left-clicking on the image in the splashscreen.
- Over-write Old
Logs - if checked the eventlogs will be over-written.
Only the previous mission log is retained, i.e. 1-level retention. If
unchecked, all log files will be stored locally in campaign
sequence.
- Log File
Location - the user chooses the file that the DCS will
inspect for logs of hosted SE missions.
- Missions
Folder - the user chooses where the DCS will look for
hosted mission files (*.mis) and where the DCS will write newly created
mission files (*.mis and *.properties).
Campaign Mode
Tab
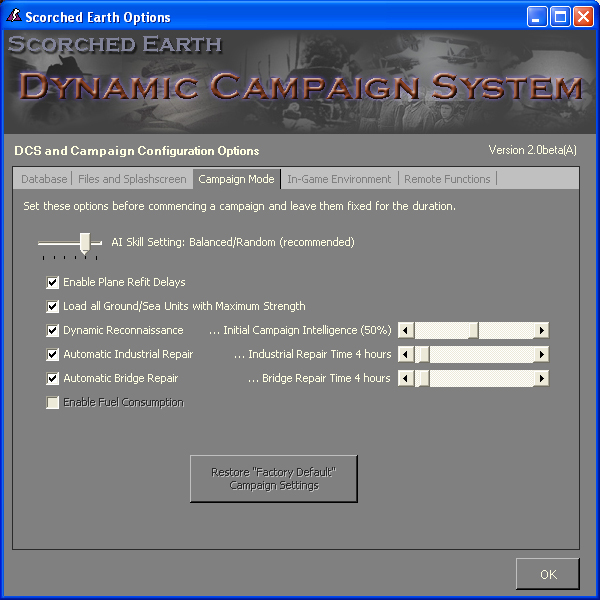
These settings configure the
style of campaign you want. Set them before initializing a campaign and
then do not change them. These settings are stored in the SE campaign
database, so other DCS connections will pick them up
automatically.
- AI Skill
Setting - the recommended setting is "Balanced/Random"
which assigns unit skills based on a particular weighting: Rookies and
Average are common, Veterans less so, and Aces rare. All aircraft in
each flight have the same skill. You don't want to encounter a flight of
Ace I-16s!!!
- Enable Plane Refit
Delays - if selected, the DCS keeps track of how long
each aircraft type needs to refuel/rearm after each mission. Once set,
this checkbox should remain unchanged throughout the campaign.
- Load Ground/Sea
Units at Maximum Strength - if selected the DCS will
initialize a campaign template with all ground and sea units loaded with
maximum unit strength, i.e. a template containing a single BMW
motorcycle will load that unit as a single platoon with 4 BMW
motor cycles. Platoon strengths are defined in the Object_Specifications
table. You can change these strengths as you see fit, but you must do it
BEFORE you initialize a campaign template for it to take effect.
- Dynamic
Reconnaissance - with this unchecked, both sides have
perfect intelligence on the other's units. With it checked, the campaign
is initialized with recon info generated randomly for a HOST-specified
fraction of units on both sides. This recon decays over time, and both
sides will rely upon information purely gained from ground unit
proximity and whatever recon flights the commanders schedule.
- Automatic Bridge
Repair - hosts have the option of allowing destroyed
bridges to repair themselves after a configurable time interval.
- Automatic Industrial
Repair - hosts have the option of allowing Factories and
Fuel Dumps to repair themselves after a configurable time
interval.
- Restore Factory
Defaults - this button will reset all fields in the
Campaign Mode and In-Game Environment tabs to "standard" values.
In-Game Environment
Tab
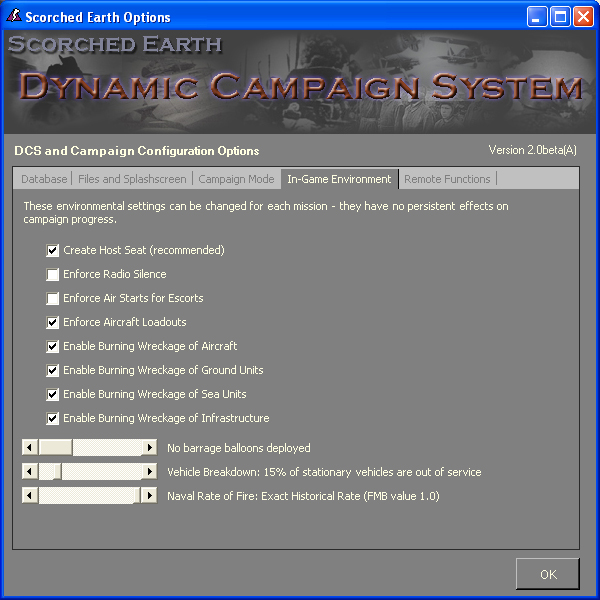
These settings can be
changed from mission to mission - they have no lasting effect on the
campaign.
- Create Host
Seat - the DCS creates missions for each campaign hour
regardless of whether there a scheduled flights. This is so the ground
war can continue. In such cases, a dummy seat is created so the host can
physically run the mission. If desired, the HOST can disable this in any
mission by unselecting this prior to hitting the "Build Next
Mission" button.
- Enforce Radio
Silence - if selected, the DCS will insert the radio
silence directives for all flights. Note that reinforcement flights
automatically have radio silence ON. There will still be annoying radio
chatter at landing time.
- Enforce Air Starts for Escorts - the HOST can
enable this prior to "Build Next Mission" to force escorts to have air
starts. This sometimes helps escorts meet their escorted units in
time.
- Enforce Aircraft
Loadouts - if selected this prevents human pilots from
selecting their own armaments and fuel loads in the game. In this case,
loadouts are determined by the Commander requests in the MP.
- Enable Burning
Wreckage of Aircraft - if selected smokes/fires will be
placed in the next mission at the locations of aircraft destruction
(during the previous mission). Smokes/fires last only for 1
mission.
- Enable Burning
Wreckage of Ground Units - if
selected smokes/fires will be placed in the next mission at the
locations of vehicle destruction (during the previous mission).
Smokes/fires last only for 1 mission.
- Enable Burning
Wreckage of Sea Units - if selected smokes/fires will be
placed in the next mission at the locations of ship destruction (during
the previous mission). Smokes/fires last only for 1 mission.
- Enable Burning
Wreckage of Infrastructure - if selected smokes/fires
will be placed in the next mission at the locations of factory, fuel
dump and bridge destruction (during the previous mission). Smokes/fires
last only for 1 mission.
- Barrage Balloon
Model - there are 3 modes for placing barrage balloons at
controlled airfields in each mission. Mode 0 is no balloons, mode 1 is
balloons only at IDLE controlled airbases, mode 2 is balloons at ALL
controlled airbases. Good for air defence but often catches friendlies
too.
- Vehicle Breakdown
Rate - this
determines the percentage of stationary (parked) vehicles (on both sides
of the war) that are rendered inert (non-combative) each mission,
simulating repair/breakdown etc. This is a random feature, inert
vehicles will change randomly between the units from mission to mission.
Member vehicles of units with current movement orders will ALL be
active. This is a neat way of reducing the FB+PF game load.
- Naval Rate of
Fire - this can be set for each mission. Recommended
value is 1.0 (historical rate) but lower rates might be useful for large
ship numbers. This setting applies to ALL ships in the mission.
Remote Functions
Tab

This tab contains some new
functions for administering remote online wars.
- Automatically Upload
Mission and Log Files - if selected, the DCS will upload
mission files (.mis and .properties) to the MySQL database
"SE_File_Buffer" table as they are created. As log files are analyzed
they will be uploaded too. This provides campaign managers with an easy
way of accessing all campaign files no matter which host's DCS is
performing functions.
- MySQL Server Archive
Folder - if this box is used the string contents will be
interpreted as a filesystem pathname and the DCS will attempt to dump
the contents of the SE_File_Buffer table to the pathname on the MySQL
server immediately after files are uploaded. The pathname can contain
expandable tokens (see the "?" button). This feature requires FILE
access to the MySQL server.
- DCS Web Script
URL - if this box is used the string will be interpreted
as a URL to a script on the Internet, and the URL will be executed by
the DCS via a HTTP POST command at the successful completion of each
Initialize, Analyze or Build command. This provides campaign managers
with a simple means of automatically running scripts on web sites at
each new stage in the SE campaign. At present only the DCS version
string is provided to the Web Script as a POST key=value pair. One
potential combination of uses is to select the auto upload function,
ignore the Server Archive and put the URL to a PHP script in the Web
Script field. When executed by the DCS, the script could then dump the
SE_File_Buffer to a zip file and archive it in a Web Portal, and then
run a statistics script to display the outcome of the latest mission on
a public web server.
How to make a template
Use IL2 PF/FB Full Mission
Builder (FMB). All tanks and vehicles, both moving and static are
supported within the template. The thing to remember though, is balance.
You don't want to over do it, nor do you want an empty field of battle.
You are free to plot any chiefs that you want to move in pre-determined
routes in the campaign. For example; 5 hrs of plotted movement will equate
to 5 hours real time in the campaign (an hour plotted for 5 separate hour
long missions). However, simple ground movement is supporting in the
MP and DCS, so you don't actually need to plot movement for ground/sea
objects in the template. Just be aware that simple ground movement takes
no notice of terrain features, objects ordered to move in the MP will
follow their routes literally using straight lines through towns, across
rivers etc. The same applies for sea units. Note that carrier air
operations are not yet supported.
To re-iterate, with SE2.0
there is NO NEED to build templates with all ground movement specified up
front. SE2.0 fully supports dynamic air, sea and ground movement at the
commanders' whims. SE campaigns are now open-ended!
Please note, scenery
is supported and will now take effect! Feel free to place trees, buildings
wherever you like to add atmosphere. They will be placed in each
successive SE mission file, but their damage state will NOT be
tracked.
Two BIG things to note
about putting aircraft in the template are:
- Give ALL your desired
aircraft units AIR STARTS with a few waypoints directing them to LAND at
their intended deployment airbases. Once the template is loaded, all
planes will be at their designated landing bases.
- NEVER use flight numbers
in the 4th Staffel/Squadron/Daitai of any Gruppe/Regiment/Kokutai when
you assign squadrons to your flights in the template. SE uses the 4th
Staffel/Squadron/Daitai of all Gruppen/Regiments/Kokutai for internal
routing, so if you take one of these names, errors may occur. For
example, IV_JG7_13 is OK (means IV/JG7 Staffel 2 Schwarm 4) but
IV_JG7_31 is BAD (means IV/JG7 Staffel 4 Schwarm 2).
Another new feature is the
in-template support for campaign objectives. Template builders can now
specify what campaign objectives each side will get. The objectives
can be put inside the .properties file alongside the standard template
.mis file. Put your general campaign background/context text inside the
<ARMY NONE> tag (both sides can read the contents of this tag in the
MP); then put your Allied campaign objectives inside the <ARMY RED>
tag (only visible to Allied commanders in the MP) and your Axis objectives
inside the <ARMY BLUE> tag for the Axis commanders to read. The
template then is contained in TWO files, e.g "myTemplate.mis" and
"myTemplate.properties". Of course, the host can alter campaign objectives
at any time as he/she sees fit, using the MP "Manage Campaign" facility.
Close both <ARMY RED> and <ARMY BLUE> tags with
</ARMY>.
Initializing a
Template
The Scorched Earth team will
endeavour to offer a single test template per supported map. Presently
there are 9 maps that are supported in 2.0beta; these are
Ardennes, Crimea, Kuban, L'vov, New
Guinea, Normandy, Prokhorovka, Stalingrad and
Tunis. For example sake, we will talk about the Normandy template.
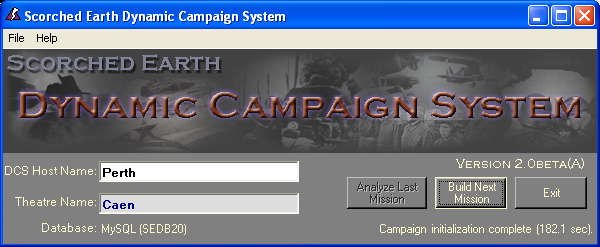
The Normandy template mission is Normandy_1944.mis. To load this template
is EASY - just start your DCS, make sure the DB is clean (DCS: File: Flush
Database), then enter your desired host name and theatre name. Where it
says HOST, make up a unique HOST system name. For example SE_YourName or
SE_YourLocation or whatever you want. Then there is a theatre name, this
is meant to distinguish your campaign, so use something catchy. The
screenshot above shows this common naming convention. The Host Name is
used as a prefix for missions created by this DCS PC. The Theatre Name is
used to designate a single campaign.
Then hit the "Initialize
Campaign" button. This will bring up a file dialog box that you can use to
find the Normandy_1944.mis file and hit OK. The DCS will then process the
template file and load the database with the initial settings. I told you
it was easy. You will see something like the following... all ready to
build the next mission (this is where you start creating orders with the
MP).
The Mission
Planner and how to use it with the DCS
There are some old movie
tutorials - they are out of date but they give you the general idea of
how to use the MP - it is all point and click!
Planning a
mission
Each hour is represented
by one single merged mission. Orders from one side of the conflict are
merged with orders from the opponent, each made in isolation from the
other side. The only limitations to assigning orders are what units are
available. You may want to take into consideration setting a hard limit
via rules as an admin. For example, no more than 16 planes ordered per
side. This functionality for scaling operations is not built into
Scorched Earth (yet). For 1.0beta, you will have to scale your
templates and mission orders appropriate to the number of humans you
wish to support in flight and with consideration of potential online
lag.
The actual process of
planning a single sortie with the MP is easy. You just hit the CREATE
NEW button. Select the UNIT to order. Select the total # of planes from
that unit (full-strength units are "flights" of 4 aircraft) to partake
in the attack. Select the hour timeslot you want the mission to be
performed. A suggestion would be to have each commander only make orders
for a single hour and then create the mission, analyze the results, and
move on to new orders.
Once the three selections
are made, the airfield where the unit is taking off from will be
bordered (highlighted) in black. At this point, you should be able to
left mouse click on any coordinate on the map to create a waypoint.
KNOWN BUG: If you have issues left clicking and a
waypoint being created, RIGHT mouse click and toggle all icons on and
off. This usually kicks out the bug. You should be able to place any
number of waypoints. If you notice, on the left frame of the mission
planner, you will see the waypoint definitions spelled out in front of
you. At any time, you can click on the speed or alt link and set that to
whatever you wish. Also, you can set the type of waypoint to fly, ground
attack, land, or withdraw. FLY, is obviously a normal waypoint. The
flight will likely attack enemies if threatened. This is likely what you
would use for all waypoints of a CAP or INTERDICTION flight. The G for
GATTACK would be used for, well, ground attacks. Don't worry about the
target to hit, you'll reset that after the mission is "finalized". As
for landing, the easiest way to force a waypoint to a landing waypoint
is to RIGHT CLICK and hit FINALIZE MISSION. This will automatically set
the last waypoint to a landing waypoint at the nearest airbase. This
makes mission orders very easy to complete. Another way to set a GATTACK
waypoint is also found in the RIGHT mouse click menu. There are also
several self explanatory selections to delete all waypoints, last
waypoint etcetera. This is a relatively easy
planner!
Setting a GATTACK
target
If any of your waypoints
are set to ground attack, you will have the option to pick which of the
most closely located objects the flight will target. We recommend, given
the possible DELAY in recon, that you chose "Target Area" for a target.
Unless the target is a bridge, factory or urban zone, you have no clue
if your recon is current or not. Most recon occurs with an hour delay.
When you look at the map, the possible targets will either by ? question
marks, or full symbols with information. The level of detail is
dependent upon the level of recon against that unit. Recon is done both
by ground unit proximity (and their range of recon ability) and recon
flights.
One common question is
"Why won't my bombers bomb the selected factory or fuel dump?" Here is
the likely answer: the SE DCS places wagons and cars inside factory and
fuel dump targets. The nationality of these dummy vehicles is set to be
the same as the controlling side of the factory/fuel dump facility.
Unless a nation has exerted control over the facility (i.e. made the
facility's icon go red or blue in the MP), the dummy vehicle will be
assigned a neutral nationality. AI flights cannot target neutral objects
other than bridges. That is an IL2 limitation. Since either side may
wish to destroy any neutral, enemy or friendly (!) target in the
extremis of war, the DCS plays it strictly safe by observing the correct
nationality at all times. So if you REALLY want to destroy a NEUTRAL or
FRIENDLY industrial facility, get some humans to fly the mission. Of
course, AI bombers quite happily destroy ENEMY industrial
facilities.
Assigning
escorts
After you set the flight
order above, you assign escorts by clicking on the subsequently visible
escort required pulldown menu and pick an option. You can then set
whether they will fly the entire way or only portion of it. You also get
to pick what flight will escort. The beauty of this is that you do not
have to set waypoints for the escort ; they are automatically
computed.
Once the mission escort is
set, hit the YELLOW BUTTON to "Commit Mission for X" where X is the name
of the unit. This will kick back a message from the HQ (literally a
confirmation from the database) with all mission parameters seen. Voila,
it's in the dbase ready to be created by the DCS executable. Please note
that there is error correction upon hitting the YELLOW BUTTON. If you
attempt to set a mission for a flight that is already assigned, it will
reject and let you go back to the MP main gui to reset escort, et
cetera.
Rinse, and repeat. Keep
adding in orders to as many flights as you wish launch for that hour. In
later betas, we will be including FUEL quantities per base. So beware,
that in 1.0beta you can launch a lot of CAP, but later on, you
may need to spare your FUEL.
Using
Reinforcements
When reinforcements are available, the commander can use them at
any time. At the moment, only aircraft are reinforced. Ships will appear
in an upcoming MP release, then ground units in a later revision. For
aircraft, there are two reinforcement methods (click the yellow
Reinforcements button).
The first method is "Top-Ups". This is
when aircraft from the reinforcement pool are used to bring
under-strength active flights back up to full strength (4 planes). You
can only top up understrength flights with reinforcements of identical
type, i.e. a flight of 2 BF_109E4B fighters can only be topped up with
BF_109E4B reinforcements, not BF_109E7. To issue top-up request, click
Top-Ups. A menu of the possible top-ups will displayed on screen, based
on matching the reinforcements with understrength flights. Select the
desired top-ups (magenta line is drawn between Supply point and
destination flight) and hit the yellow "Commit" button. Once accepted,
the Top-Up flight (using a 4th Squadron transfer flight) will be flown
in the next SE mission. No further action is required - the
understrength flight will automatically be re-strengthed with the new
aircraft that arrive successfully). Top Up flights cannot be given any
combat task on their initial transfer mission. They can be flown by
human pilots where appropriate to aircraft type.
The second
method is "New Units". This is when the commander orders a totally new
unit to be constituted from the reinforcement pool. The commander clicks
"New Units", selects the type of aircraft, the destination base and the
regimental name, then hits "Commit". This sets up the new flight in the
database, and the flight's transfer mission to the destination is flown
in the next SE mission. No further action is required. New Unit flights
cannot be given any combat task on their initial transfer mission. They
can be flown by human pilots where appropriate to aircraft type.
Here is a trap. If you are requesting New Units as the Admin
user, you will be presented with a list of both Axis and Allied
Regiment/Squadron/Flight names. Make sure you choose a name of the
correct nationality! This *feature* does not occur for users logged in
under Axis or Allied accounts.
Off Map flights and
Withdrawals
Here is a subtlety. Withdraw points are used to move active
aircraft into the Reinforcements pool. To do this, issue flight orders
with the last waypoint on a Withdraw point, and select "Finalize
Mission". All planes in the flight that survive the mission will appear
in the reinforcements pool for the corresponding Supply point.
On the other hand, Supply points can be used directly as "Off
Map" bases. Off Map bases are used to simulate long-range missions. To
designate a flight to take part in Off Map missions, simply issue orders
for it to fly to a Supply point and then select "Finalize Mission". The
unit's survivors will next be available for tasking at that Supply point
as an Off Map unit. In the one mission, you can order an Off Map flight
to fly into the map, do a GATTACK/ESCORT/RECON/CAP/whatever and fly back
to the same Supply point (remain Off Map), or rebase to an landing
field, or fly to a different Supply point (stays Off Map at the new
location) or fly to a Withdraw point (goes to Reinforcements pool). Off
Map flights with current orders start the SE mission at altitude near
their Supply points.
Note that New Unit reinforcement flights
can be allocated directly as Off Map flights without first having to run
a transfer mission.
What
if I want to edit missions before creating the mission
files?
So, you really screwed up ordering
your flights. No worries. When you go back into the whole sector map,
you should see a yellow button newly highlighted stating "3 missions" or
whatever number of air missions you have ordered. Just click that
button, then select the mission to edit. The rest is self explanatory.
Just fix or delete whatever you wish, resubmit with the big yellow
button, confirm the data, and voila, you are ready to
go.
Creating the mission
The MP or Mission Planner is only
an interface for opposing commanders to assign orders for available
flights. It does not actually CREATE the mission, nor does it parse the
previous mission. The DCS program on the HOST's pc does this part. It is
very easy to do. At the main DCS GUI, just hit "Build Next Mission" and
voila, a dialog will show you the the file is being created and tell you
when it is ready to fly. The MP will not allow you to schedule missions
that lie in the past - the MP and the DCS use synchronization logic that
is held in the database.
Running a mission
Once the HOST has hit
'Build Next Mission' in their DCS main program, the mission is placed in
their "Missions" folder as set in the DCS:File:Options screen. The
format of the filename will be the SE_TheatreName_DayTime.mis All they
need to do is hit Multiplayer / Cooperative, browse to the SE
missions folder and click on the mission, just like in running any other
coop mission online.
Analyzing a
mission
Once the mission is
complete, the information needs to be parsed into the database. All the
HOST needs to do is go into their DCS program main gui and hit the
"Analyze Last Mission" button. Thats it. When you go back to the MP and
hit REFRESH, the new data will be present to the system and the Scorched
Earth system clock will advance to 14:00 , 15:00, et cetera as you go
through sequential missions. Please recall that RECON and ground unit
movement takes an hour to update. The information you are presented is
at least an hour old! This is a built in simulation of the amount of
time that was required to debrief flights and piece together
intelligence in the 1939-45 war.
Capturing Airbases and
Control Points
Control of Airbases and
the new Control Points has been reworked in version 2.0beta(F). Now you
really have to CAPTURE them and HOLD them. The minimum size of
a capturing force is specified in the DCS Options - only ground
forces can capture airbases and control points. Once you control such a
position you can only lose it if your forces leave or if they are
entirely destroyed. The opposition can only capture the position if
their controlling size force is unopposed within the control radius. If
both sides have units within the control radius, the position is "In
Dispute". If, as far as your recon intelligence is concerned, no-one has
any units nearby, then the position may appear "Apparently Unoccupied",
although both sides have perfect intelligence on whether an Airbase or
Control Point is controlled by the enemy. Aircraft are not counted as
controlling units. Remember, don't feel safe just because there are no
enemy units within the control radius. Some units can lob shells over
much linger distances. Enemy ships in Port Moresby harbour can easily
shell most airbases in the vicinity, so your aircraft will not last
long!
Running Seaplane
Missions
There are now seaplane
bases defined for most sectors with seas or large lakes. Seaplanes can
operate out of these bases if they are under friendly control. Seaplanes
can also transit on the open sea between missions, simulating the
marathon missions that many of them undertook in 1939-1945. To do a
transit mission, order the seaplane to land on the open sea. It will
happily do so, and will be there for the next mission, ready to take off
again without refueling delay. Seaplanes have a big recon boost too,
they can see a long way.
|